Welcome to the second part of my tutorial. Part one of the hand stitching tutorial is here .
I should preface this
section of the tutorial with a disclaimer: no happy bunnies were harmed
in the making of this tutorial. Felt creatures enjoy having faces sewn
on, no matter how gruesome the photographs might make it seem.
So,
at this point you should have stitched all the way around your softie,
leaving a hole that is a couple of inches big for stuffing.

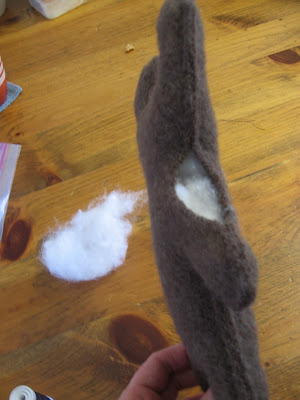
Take a handful of polyfil out of the bag:

Squish
it a few times until it gets smaller, like this, and then stuff it into
the hole. Stuff the extremities first: legs, ears, tails, that kind of
thing. You want to stuff it firmly enough so that it is 3 dimensional,
but not so firmly that it looks like it is about to burst.

If
you are finding you can not pack the stuffing in as much as you would
like with your hand, use the flat end of a pen or the eraser end of a
pencil. I did this for the ears:

See,
I stuffed the legs and the ears first, since they are almost impossible
to get to once you start stuffing the middle. If you find you have a
section where you stitched too loosely, so that even a tiny bit of
stuffing is pushing the two sides apart, go back and re-stitch it with a
new piece of thread.

Once
you have done the legs and ears, stuff the arms, and then the middle.
You will find that the fabric stretches. This is okay, so long as it
doesn't thin out so much that you start to see the stuffing through the
fabric. You can see that my bunny is now taller than he was before. When
it is nicely full but not overstuffed, stitch up the hole. Start about a
cm. away from the beginning of the gap, and stitch 1cm over the other
seam on the other side.
You
should now have a softie that looks something like this guy below.
It
is now time to embellish! I
will show you how to do basic embroidery (a back stitch), put on
buttons, and add contrasting felt decorations. You should know that I
have sort of learned all these things on my own, so my
techniques are not professional. They do, however, get the job done.

Thread
your embroidery needle with your embroidery floss. If you want a
thinner piece of thread, you can divide your floss. Cut the length you
want, and then pull apart the number of strands you would like to use
for the project. Because I am lazy, I usually use all 6. You might have
to lick the end of the floss and flatten it with your finger to help
manouver it through the needle. You could use a little bit of lip balm
on the end if you are averse to giving away a creature that contains
your saliva.
After your needle is threaded, tie one knot of the end.

Decide where you want to place your first button eye.

Poke
your needle into and out of the fabric. Hold the button nearby, so you
can make sure that your stitch will be hidden under the button.

Pull
the thread through. Try to pop the knot to the inside of the fabric by
tugging gently. If it doesn't work, clip the thread close to the knot
(but don't cut into the knot or it will unravel). Put your needle
through the hold in the button, and pull the thread through.

Lie
the button flat against your guy's face. Poke the needle through a
button hole opposite to the one you just used and into the fabric below
it.

Then
push the needle kind of flat and poke it back out of the fabric. Make
sure all of the stitch will be covered by the button, then pull it
tight. Now push the needle through the button hole you started at and
pull tight. Repeat two or three times for each set of holes. This takes a
bit of needle wrangling, but its the best way I know to secure a
button.

Now,
poke the needle through any hole. If you want the buttons to be a bit
more secured (and your mass of threads to look a bit tidier) wrap the
thread around all your previous stitches once or twice. Then tie a knot
the same as you did when you were ending a thread while stitching along
the sides. Make sure the knot will be covered by the button as well, and
clip your thread very short.

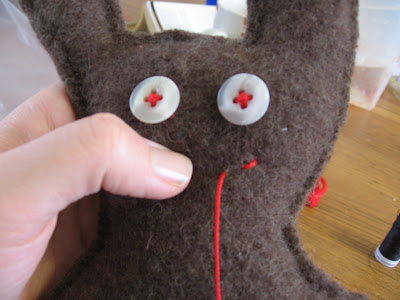
Congratulations! You just sewed a button on. If you are not making a cyclops, sew on a second button.
Now for a mouth. The simplest way to do this is by using a basic embroidery stitch called a back stitch.
Figure
out where you want your mouth to be. Draw it on with some chalk or a
light white crayon line if you want. Tie a knot on a fresh piece of
embroidery floss and thread it into your needle. Now insert your needle
at the very edge of the line.

Push the needle through about .5 - 1cm, depending on how big you want your final stitches to be.

Pull the thread through. If possible, pop the knot inside the fabric or clip the thread close.

Now,
reinsert the needle in the spot where you want the mouth to start (this
is why it is called a back stitch). Push the needle back out where you
want your second stitch to end.

Gently
pull your thread through. Don't tug too tight, or you'll just pucker
the felt and you won't be able to see the embroidery stitch.
Congratulations. You have achieved a backstitch.
Now
back stitch again, putting your needle into the fabric right next to
your first stitch, and pushing it out of the fabric where you want your
third stitch to be. Repeat until you have a mouth the length you want.

If
you don't like the shape of your finished mouth (it takes practice to
not make a really evil looking or just really crooked mouth), cut the
string off and pull the stitches out. You can do this by sliding your
needle under the stitch and using it as a lever to pull the stitch out.
If you sew for any length of time, you will become really good at taking
stitches out.
Now, for your last stitch, you want to
put the needle into the fabric close to your last stitch, like before,
but push the needle through a lot of stuffing and out somewhere else on
the head. Pull tight and clip the thread close to the fabric. Push the
thread around with your fingers until it disappears into the fabric.
This should keep the stitching in place. Congratulations, you have just
done your first basic embroidery.

You
can also use backstitches to add any other details you might like. If
you want to make circles, or fill things in, do a vertical backstitch
(where the stitches are next to each other instead of end to end).
Now
I will show you how to add felt decorations. If you are a pro stitcher,
you can use a blanket stitch. If you are not up for learning another new stitch right now, follow my stitching hack below (note that this only works for fabric that will not unravel).
Cut out your felt shape,
and decide where you want it to be. Thread your needle with a fresh
piece of thread and tie a knot on the end.

Put
the needle into the fabric in a spot that will be underneath your felt
piece. Push the needle out through the fabric and the felt piece about
.5 cm in from the edge.

Pull your thread through. Push the needle into the fabric just behind the felt piece.

Push
the needle so that it comes out through the fabric and the felt piece.
It should be .5 cm to one side of your original stitch, and .5cm from
the edge of the felt piece.

Now,
pull it gently, so it is flat but not too tight, and you have your
first stitch. Repeat this until you have gone all the way around your
shape.

When you are done, make a small loop and tie a knot just underneath the felt. Clip the thread close to the knot.

You are finished! Congratulations on completing your first sewing project!
If you make one of
these little guys, please leave me a comment and let me know.
Happy stitching!


